
You can control Arduino's pins by ArdunoMonitor and watch changes on pins. This is useful for debugging your hardware before you write a sketch.
Place iArduino folder into your libaries folder of your Arduino folder. Then, upload Examples->iArduino to Arduino.
Connect Arduino and PC, then execute ArduinoMonitor. Chose the serial port Arduino is connected and click ``Connect'' button. You will see that it starts updating pins' status on Arduino. Note that all the pins on Arduino except for pin 13 (LED's pin) are inputs with the skecth below. This is different from the Firmata example which comes with Arduino IDE. The example makes pins as digital output (LOW).
The connection is terminated by clicking ``Disconnect'' button. Click `X' to quit ArduinoMonitor.
Select the usage of the pins from pull down menu on the side of the pin. DIN and AIN corresponds to digital and analog input. If you chose DOUT (digital out), radio buttons LOW and HIGH appear to change its logic level. If you chose PWM (analog output) or RC (R/C servo motor), it shows a lider to the pin's control output value.
If you check ``show in voltage'', the values of analog pins are show in voltage rather than direct value. You need to put analog refrence voltage on the text box under the check box. It is 5[V] by default.
It starts logging in CSV format by clicking ``Start Log'' button. Note, it will overwrite an existing file. The sampling rate is about 0.1[s] per sample. Click ``Stop Log'' button to stop logging.
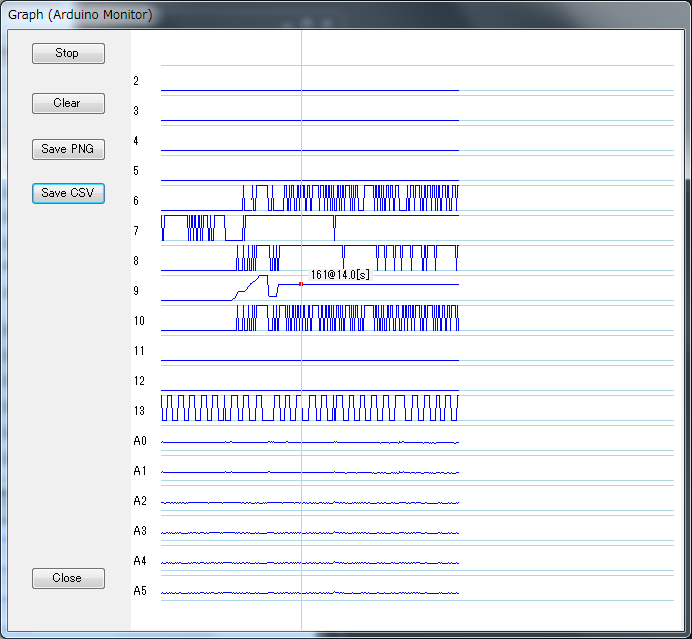
It shows a graph window by clicking ``Graph'' button. The window shows status of the pins as a graph. Blue lines indicate lowest value (0) on pins. Red lines indicate highest value (1 for digital inputs and ouputs, 1023 for analog inputs, 255 for PWM (analog outputs), and 180 for RC servos) on pins.
It stops updates of the graph by clickng ``Stop'' button. The ``Clear'' button clears graph area. It saves a graph image in PNG format by clicking ``Save PNG'' button. It saves values in CSV format by clicking ``Save CSV'' button. The close button is for closing the window. The sampling rate is about 0.1[s] per sample.
It saves and loads configuration in XML format by clicking ``Save'' and ``Load'' buttons. The file to save/load is specified by the text box above the buttons. Note, it will load/save without showing a file dialogue if the file is specified. You see the dialogue by double clicking the text box.
Pressing `Show code' button shows source code for Arduino IDE. Use "Save" button to save to a file. The window will close when you click ``Close'' button.
You can monitor pin values while Arduino is running your sktech from version 0.2 of ArduinoTerminal. An example sketch is available in iArduino -> ArduinoTerminal -> BareMinimum. Put your codes as comment suggests. Since Arduino and ArduinoTerminal communicates in debug.check() function, you cannnot monitor if the function is not called.
#include <EEPROM.h>             // include EEPROM.h even if you don't need it
#include <Servo.h>              // include Servo.h even if you don't need it
#include <iArduino.h>           // include library header

iArduinoHandleProtocol debug;   // declare iArduinoHandleProtocol

void setup() {
  debug.begin();               // initialize iArduinoHandleProtocol
  			       // Serial port is initialized at
                               // 115.2kbps.
  // put your setup code here, to run once:

}

void loop() {
  debug.check();               // call this function periodically
  // put your main code here, to run repeatedly:

}
Here is annother example based on 0.Digital -> BlinkWithoutDelay. This example blinks LED on pin 13 and sends HIGH/LOW to PC via serial port. Arduino answers back "Recieved 1." if you send '1' from PC. Text box on the left of ArduinoMonitor is the therminal area.
You can use Serial.println() and other print() functions as usual. You need to use debug.available() or debug.read() instead of Serial.available(), Serial.read(). Please make it sure that either Arduino nor PC sends 0x7f which is used for debugging protocol.
You can use your sketch ASIS after debugging.
/*
   This sketch shows an example use of iArduinoTerminal for debugging without
   using iArduino language. The sketch extends Blink without Delay in the example.
 */

#include <EEPROM.h>             // include EEPROM.h even if you don't need it
#include <Servo.h>              // include Servo.h even if you don't need it
#include <iArduino.h>           // include library header

iArduinoHandleProtocol debug;   // declare iArduinoHandleProtocol

const int ledPin =  13;
int ledState = LOW;
long previousMillis = 0;
long interval = 1000;

void setup() {
  debug.begin();               // Setup, serial port is initialized.
                               // The baudrate is 115.2kbps.
  pinMode(ledPin, OUTPUT);
}

void loop()
{
  debug.check();               // Periodiclly call this function

  unsigned long currentMillis = millis();

  if(currentMillis - previousMillis > interval) {
    previousMillis = currentMillis;

    if (ledState == LOW) {
      ledState = HIGH;
      Serial.println("HIGH");  // You can use Serial.flush, print, println, and write
                               // as usual.
    } else {
      ledState = LOW;
      Serial.println("LOW");
    }

    digitalWrite(ledPin, ledState);
  }

  if (debug.available()) {    // Use available() of iArduinoHandleProtcol instead of
                              // Serial.available()
    int c = debug.read();     // Use read() of iArduinoHandleProtcol instead of
                              // Serial.read();
    if (c == '1')
      Serial.println("Recieved 1.");
  }
}